Potholes in the street are an annoyance. You can’t control them. You can only drive around them and hope your suspension survives. But a pothole in your own driveway is worse. It’s a tripping hazard. It’s a tire killer. And it’s yours to fix.
The good news? You don’t need a crew of road workers. You just need some concrete, the right tools, and a day to spare.
Gather the Right Gear
Before you start swinging hammers, check your inventory. You’ll need heavy-duty gear. Light tools will break.
Tools:
– Safety goggles (non-negotiable)
– Cold chisel
– Sledgehammer
– Stiff broom
– Garden hose with a spray nozzle
– Sponge
– Sturdy wheelbarrow
– Shovel
– Stiff paintbrush
– Hand trowel
– 2×4 board (long enough to span the hole)
– Wood cement float
– Push broom
– Plastic dropcloth
– Weights (bricks or sandbags)
Materials:
– Ready-mix concrete: Choose sand mix for shallow cracks. Use gravel mix for deep holes.
– Liquid concrete bonding agent
– Water
Time: Expect one full day for the repair. Plus, a few minutes daily for a week during curing.
Prep the Hole (Don’t Skip This)
Most DIY repairs fail because the prep is rushed. Don’t rush.
Put on your safety goggles. Grab your cold chisel and sledgehammer. Start chopping out loose, crumbling concrete. You need to reach sound concrete. If the base is weak, the new patch will fail.
Crucial step: Angle your chisel to undercut the edges. The hole should be wider at the bottom than at the top. This mechanical lock keeps the patch from popping out later.
Once the loose debris is gone, sweep it out. Flush the hole with a garden hose. Use the sponge to soak up standing water. The hole must be damp, not swimming.
Mix and Apply the Bonding Agent
Mix the ready-mix concrete according to the bag instructions. Pour it into your wheelbarrow. Add water. Mix it with a shovel until it’s uniform.
Now, work fast.
Pour a small amount of liquid concrete bonding agent into the hole. Use a stiff paintbrush to coat every inch of the interior surface. Get into those undercut corners. If the bonding agent dries before you pour the concrete, the bond fails.
Clean your paintbrush immediately with water.
Pack the Concrete
Shovel the mixed concrete into the hole. Use your trowel to press it in. You’re packing it tight. Any air pockets are future failure points.
Mound the concrete slightly above the existing driveway level. Concrete shrinks as it cures. You want extra height to account for that.
Tamp it down with the back of your shovel. Add more concrete if needed. Tamp again.
Level and Smooth
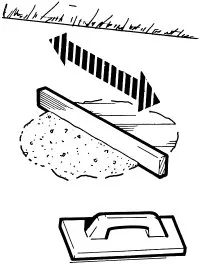
Set your 2×4 across the hole. If the patch is large, get a helper. One person on each end.
Start at one end. Draw the 2×4 in a zigzag motion. Pull and push. This screeds the concrete. You’re leveling it to the surrounding driveway.
You’ll see a film of water on the surface. That’s normal.
Let it sit for 45 minutes to an hour. The surface water will disappear.
Final Smoothing
Once the sheen is gone, take your wood cement float. Smooth the patch again. Use long, even sweeps.
Stop when a new film of water appears on the surface.
If you want a non-slip finish, use a push broom now. Drag it across the patch and onto the old concrete to blend the texture.
Let the final water film absorb into the concrete.
Cure It Properly
Cover the patch with a plastic dropcloth. Weigh down the edges with bricks or sandbags. Do not place weights directly on the soft concrete.
Here is the part most people ignore: Curing.
Leave the plastic in place for about a week. For the first few days, remove the plastic several times a day. Spray the patch with a fine mist from your garden hose. Re-cover it.
Concrete needs moisture to cure properly. If it dries too fast, it cracks.
After a week, you can walk on it. Drive on it only after it has fully hardened, which can take longer depending on temperature and humidity.
Why This Works
You might wonder why you can’t just dump concrete in and walk away. Concrete is a chemical reaction. It needs water. It needs time. If you rush the cure, you get a weak, chalky surface that will crumble under the weight of your car.
By undercutting the edges and using a bonding agent, you’re creating a mechanical and chemical bond. By keeping it moist, you’re ensuring the cement hydrates fully.
It’s not magic. It’s chemistry. And a little elbow grease.
Safety First
Home repair saves money. But only if you don’t end up in the ER. Wear your goggles. Concrete gets in eyes. It causes permanent damage. Lift with your legs. And know your limits. If the pothole is massive, or the structural integrity of your driveway is in question, call a pro.
But for a standard driveway pothole? You’ve got this. Just take your time.