You hold the dial. You twist it. The machine starts. No microchips. No resistors. Not even a single capacitor.
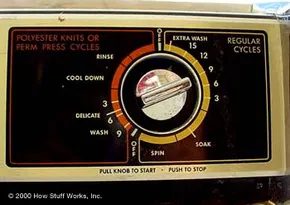
This appliance predates the digital era. The control logic lives entirely in gears, cams, and springs. Understanding how it runs means looking at the cycle switch, the heart of the timing mechanism.
What the cycle switch actually does
The cycle switch dictates duration. It sets how long the wash phase lasts. It controls the rinse cycle length. It determines spin time. Every interval is mechanical.
No software calculates these windows. A physical cam rotates. A lever trips. A contact closes. The motor runs until the gear alignment changes.
If you are planning a DIY repair, this is the component that fails first. The plastic gears wear. The spring tension loses grip. The contacts oxidize.
You do not need a logic analyzer to diagnose this failure. You need a multimeter and patience.
Check the resistance across the terminals as you turn the dial by hand. You should see continuity change at specific points. If the resistance jumps erratically, the switch is bad. Replace it. Do not try to clean the internal contacts. The wear is usually in the gear teeth, not the metal surfaces.
Safety first. Unplug the unit. The motor can start unexpectedly if you trigger the switch while power is on. Lockout tagout applies here, even for a simple appliance.
The next step involves the timer motor.
How the internal mechanism actually works
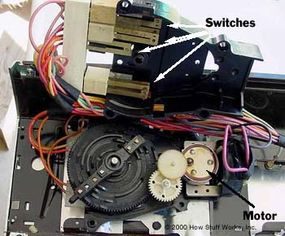
Peek inside the switch casing. You’ll see a small motor driving a massive gear reduction. That gear train is the whole reason the control dial feels so heavy and slow. It’s not friction or bad lubrication. It’s physics. The motor spins fast, but the output shaft barely creeps. This slow rotation is what gives you that fine-grained control over airflow.
In the top half of the assembly, look for six distinct contacts. These are the electrical switches that actually turn the fan stages on and off. They don’t move randomly. They are actuated by a plastic arm attached directly to the dial. This arm holds six small metal pieces, one for each contact.
Here is the mechanical dance. As you turn the dial, the gear reduction translates that rotation into tiny vertical movements. The plastic arm has bumps or cams cut into it. These bumps ride the shaft. As the arm spins, these bumps physically push the small metal pieces up and down.
When a piece rises, it closes the circuit. When it drops, it opens.
That is it. No microcontroller. No smart chip. Just plastic, metal, and gears.
Why the dial feels so stiff
You might wonder why you have to put some muscle into turning that dial. It’s not stuck. The gear ratio is extreme. Maybe 100:1 or higher. The motor has to work hard against the load of those six metal levers and the contact springs. If you are disassembling this for cleaning or repair, be gentle. Those internal springs have tension.
Troubleshooting stuck or skipping stages
If your fan seems to skip a speed or won’t go below medium, the issue is usually mechanical, not electrical.
- Wear on the plastic arm: The bumps on the arm can wear down over time. If a bump is worn flat, it won’t lift the metal piece high enough to close the contact. The fan stays on or off, depending on the stage.
- Debris buildup: Dust, pet hair, and oxidized metal flakes get packed between the contacts and the plastic arm. This prevents the metal pieces from moving freely.
- Broken contact springs: The small metal pieces need a spring to snap back down. If that spring breaks, the contact stays open. You lose that speed stage entirely.
What you need to open it up
Before you start prying, grab a few tools.
- A small Phillips-head screwdriver.
- A flathead screwdriver or a plastic trim tool to pop off the bezel.
- Compressed air or a can of electronic contact cleaner.
- A small brush with stiff bristles.
Safety first. Unplug the unit. Always. Capacitors can hold a charge even after the plug is pulled. Wait a few minutes before touching the internal board if you’re unsure.
Cleaning the actuator assembly
Once the top case is open, you’ll see the plastic arm clearly. Hold it gently. Don’t twist it. Use the brush to sweep away the gunk around the bumps. Get in the crevices. Then, use the contact cleaner. Spray it on the contacts and the metal pieces. Let it evaporate. Do not use WD-40 or heavy oils. They attract more dust and degrade the
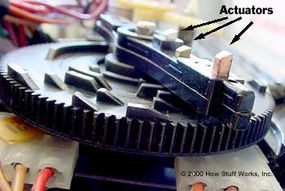
How the cycle timer dictates your wash time
The cycle timer acts as the brain of the appliance. It determines exactly how long each phase lasts and when the machine pauses before switching tasks.
Look at the bumps on that plastic disk. They aren’t uniform. The front edge slopes upward gradually. The back edge is steep. This asymmetry is why the dial only spins one direction. Push it backward? The metal contacts wedge tight against the steep back of the bumps. You physically cannot reverse the cycle.
The geometry is the program.
– Bump length : Defines the duration of the active cycle phase.
– Gap length : Sets the pause time between tasks.
The plastic disk is the software. The shape of the bumps is the code.
Understanding this mechanism helps explain why certain wash settings feel so rigid. You are not adjusting a digital countdown; you are aligning physical metal pieces with a fixed, molded track.
Simpler controls for speed and temperature
The speed and temperature control switches are significantly less complex than the cycle timer. They don’t rely on the same interlocking bump mechanism to sequence long, multi-stage operations. These switches typically handle single-variable adjustments without the intricate timing logic found in the main dial.
Because they manage immediate state changes rather than timed sequences, their internal construction is far more straightforward. You are essentially toggling a circuit on or off, or selecting a preset resistance, rather than navigating a physical track that dictates the entire wash program.
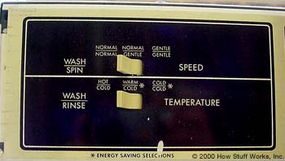
How the water temperature switch directs flow
Those switches do two things. They set the motor speed and they decide which solenoid valve opens during fill cycles.
Pick hot. Only the hot water solenoid opens. The cold line stays shut tight.
Pick warm. Both valves pop open at the same time. You get a mix from both lines, usually leaning toward the warmer side depending on your home’s supply pressure.
Pick cold. Only the cold solenoid activates. No hot water touches the drum during that fill phase.
This happens automatically for both the main wash and the final rinse. You don’t override it manually once the cycle starts. The machine reads the setting, signals the correct valve, and moves on.
If you’re troubleshooting a temperature issue, check these solenoid connections first. A stuck valve or a failed relay can force the wrong water into the tub, even if your dial says otherwise.
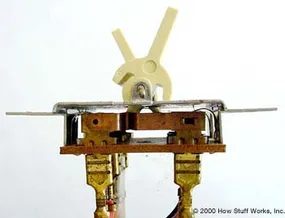
How the plastic rockers actually work
The speed and temperature controls are deceptively straightforward. Every plastic rocker on your washer’s control panel flips a mechanical lever inside the switch housing. That single physical motion handles two separate electrical paths at once.
One path closes. The other opens. Always.
This dual-contact setup is why you see two terminal pairs for a single switch. If the rocker is up, contact set A closes the circuit and contact set B breaks it. Flip it down, and the roles reverse. No microcontroller logic. No complex logic gates. Just physical metal bridges snapping into place or pulling away.
Why does this matter for troubleshooting? If your heater isn’t kicking on, or if the motor runs at the wrong speed, you are likely looking at a failed contact pair. The plastic housing might look fine, but the metal strips inside can oxidize, warp, or simply snap. When you test continuity with a multimeter, you will see exactly which pair is broken.
The level sensor uses a pressure switch to detect the water level in the tub.
What the pressure switch actually detects
This is the part that confuses most DIYers. The sensor does not touch the water. It does not float. It is not a float valve sitting in the drum.
It is a pressure switch connected to the tub via an air tube.
Here is the mechanism:
1. Air from the tub travels up a plastic tube to the switch.
2. As the water level rises, the hydrostatic pressure pushes air harder into the switch.
3. Inside the switch, a diaphragm flexes under that pressure.
4. That flexure moves a tiny lever, closing or opening a circuit.
When the tub is empty, the diaphragm is flat. The contacts are in their “low water” state. As you fill the tub, the pressure builds. Once that pressure hits a specific threshold, the diaphragm pushes hard enough to flip the lever. The circuit changes state. The computer board registers this change and tells the motor to stop filling.
If the water level is wrong, the problem is rarely the switch itself. It is usually the air tube.
- Check for kinks in the plastic tube running from the tub to the switch.
- Look for cracks or disconnections at the fittings.
- Blow gently into the tube end to ensure air flows freely.
A blocked tube means the switch never sees the pressure rise. The washer thinks the tub is empty when it is actually full. Or, if the tube leaks, the switch sees low pressure and the washer stops filling too early.
Testing the switch without tearing down the machine
You can test the pressure switch without removing it from the cabinet, though access is tight.
- Unplug the washer. Safety first.
- Locate the switch, usually mounted on the top or side of the tub, connected by that air tube.
- Disconnect the air tube.
- Use a multimeter set to continuity or ohms.
- Blow gently into the open end of the tube attached to the switch.
Listen for a click. Measure the resistance across the terminals.
- No pressure: One set of contacts closed, one open.
- Pressure applied: The
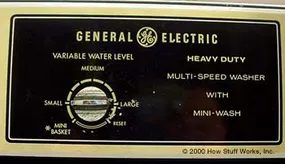
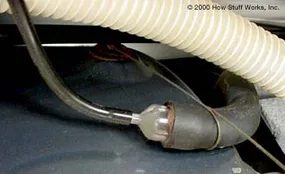
How the float valve regulates fill height
This switch controls how high the tub fills with water.
The mechanism works on compression. The big end of the hose connects to the bottom of the tub, while the small end connects to the switch. As the water level in the tub rises, water rises in the hose also. The air in the hose is trapped, so as the water rises, the air is compressed.
Why compressed air triggers the shutoff
That trapped air is the key. When the water level hits your desired height, the column of water in the hose pushes down on the trapped air pocket. The pressure from that compressed air pushes against the float mechanism inside the switch. Once the pressure is high enough, it forces the valve to close.
The water stops flowing. The tub is full.
If you want the tub to fill higher, you extend the hose or adjust the float setting. If you want a lower fill, you shorten the effective length of the air column. It’s simple physics doing the heavy lifting. No electricity. No sensors. Just water pushing air, and air pushing a valve.
Make sure the hose isn’t kinked. A kink changes the pressure reading. The valve might shut off too early or never shut off at all. Straight hose, clean connection, correct air pocket. That’s how you get consistent fill levels every time.
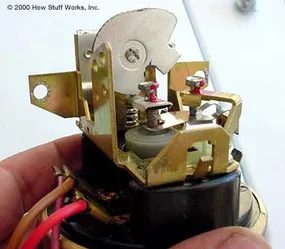
How the pressure switch actually sees the water level
Stop thinking about the water itself. The machine doesn’t “see” it. It feels the pressure.
Inside that plastic box on the back of the washer sits a tiny piston. Air from the fill hose pushes against the bottom of it. As the drum fills, that air pressure builds. Once it hits a certain threshold, the piston snaps up. That snap closes an electrical circuit. The computer registers the click and stops the inlet valve.
That threshold isn’t fixed. It’s a dial.
Adjusting the level: why the cam matters
You see that knob on the control panel? The one for “High,” “Medium,” or “Low”? That knob turns a cam mechanism.
When you twist it, the cam rotates. Its curved edge presses against a spring that sits on top of the cylinder containing the piston.
Here is the trade-off:
– Turn the knob to High, and the cam pushes the spring down harder.
– The piston now needs more pressure to lift against that extra spring tension.
– More pressure means more water in the drum before the switch trips.
Set it to Low, and the cam pulls back. The spring offers less resistance. The piston pops up early with less pressure, cutting off the water sooner.
It’s mechanical, not digital. No sensors. Just air, a spring, and a piece of plastic clicking into place.
Troubleshooting: when the level is wrong
If your machine is overfilling, the problem might be that the cam is stuck, or the spring has weakened. If it’s underfilling, check the air tube for kinks. A blocked tube means the pressure never builds, and the switch never fires.
Before you replace the switch, trace the clear plastic hose from the drum to the pressure box. Make sure it’s clean. A single lint plug can stop the air flow completely, tricking the machine into thinking it’s empty when it’s actually full.
The “set point” is just the point where the air force equals the spring force. Change either one, and you change the water level.